Steps 1: Open Controller, you will see a Create New scenario pop up by default on opening the Controller.
Test
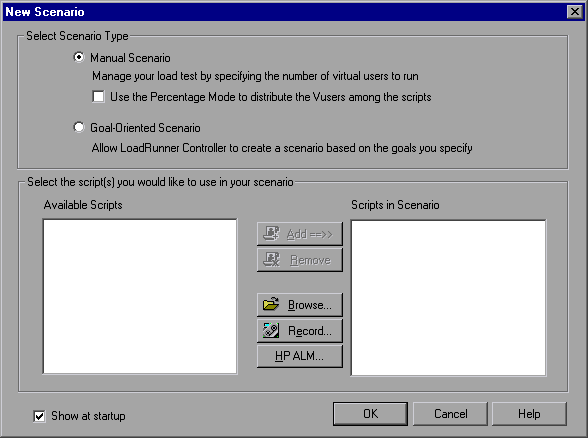
Step 2: Select a Scenario type:
There are two types of scenario:
A Manual Scenario gives you control over the number of running Vusers and the times at which they run, and lets you test how many Vusers your application can run simultaneously. You can use percentage Mode to distribute the total number of Vusers between the scripts based on apercentage specified by your business analyst. The Percentage Mode check box is selected by default the first time you start LoadRunner following installation. If it is selected, clear it.
A Goal-Oriented Scenario is used to determine if your system can achieve a particular goal. You determine the goal based on, for example, a specified transaction response time or number of hits/transactions per second, and LoadRunner automatically builds a scenario for you based on these goals.
Step 3: Add a script to the load test.
Click the Browse button, and navigate to a vuser script. The script is displayed in the ‘Available Scripts’ section and in the ‘Scripts in Scenario’ section.
Click OK. The LoadRunner Controller opens your scenario in the Design tab.
The Controller window’s Design tab is divided into three primary sections:
- Scenario Groups pane
- Service Level Agreement pane
- Scenario Schedule pane

Scenario Groups pane : User can configure the Vuser groups in the Scenario Groups pane. You create different groups to represent typical users of your system and specify the number of Vusers that will run, and the machine that they will run on.
Service Level Agreement pane : When you design a load test scenario, you can define goals or Service Level Agreements (SLAs) for the performance metrics. When you run the scenario, LoadRunner gathers and stores performance-related data.
When you analyze the run, Analysis compares this data against the SLAs and determines SLA statuses for the defined measurements.
Scenario Schedule pane: In the Scenario Schedule pane, you set the load behavior to accurately portray real-world user behavior. You define actions according to which the Vusers will run, the rates at which load is applied to the application, the load test duration, and how the load is stopped.
Load Generators:
Load generators are the machines that create load on the application by running Vusers. You can use a number of load generators, each hosting many Vusers.
1. Add a Load Generator (LG)
In the Design tab, click the Load Generators button. The Load Generators dialog box opens, showing details for the load generator called localhost.

The status of the localhost load generator is Down. This indicates that the Controller is not connected to the load generator.
2. Test the load generator connection.
When you run a scenario, the Controller connects to the load generators automatically. However, you can test the connections before trying to run the scenario.
Select localhost and click Connect.
The Controller attempts to connect to the load generator machine. When a connection has been made, the status changes from Down to Ready.
Click Close.
|About Load Runner |Creating scripts in Load Runner |Load Runner scenario |LR Analysis |Performance Tuning |Performance Testing |LR Errors |Interview Question |Load Runner Tool |Correlation Practice |Site Map |